
Send us
your footy
Back up your footage. Follow the pictures.
Text Casey when it’s uploaded.
Crew guide preview Casey will confirm when to start using this guide.
Your upload guide
Open a section to beginEvery step has a picture. Screenshot means an app capture. Example screen means a recreated illustration. Your app version may look a little different.
01Connect OpenVPNRemote uploads · stay connected6 steps
Already installed and connected? Go to Synology Drive setup.
- 01.1
Open the Playbook
Open Remote Uploads in the Playbook. Get the VPN profile and the OpenVPN Connect login details.
Example screenWhat to look forStart HereRemote UploadsRemote Uploads
OpenVPN Connect loginDownload the Paros profile (.ovpn)
Username: from the Playbook
Password: ••••••••Synology Drive Client login
Use the OpenVPN details here. The Drive login is separate. - 01.2
Install OpenVPN Connect
Download OpenVPN Connect for Mac. Open the installer and follow its prompts.
Example screenWhat to look forOpenVPN ConnectDownloaded installerOpen the installer → follow its promptsIllustration of the downloaded installer, not a specific installer dialog. - 01.3
Add the VPN profile
Open OpenVPN Connect. Click Upload File and choose the Paros .ovpn file. If a profile is already listed, use + to add one.
ScreenshotWhat to look forChoose Upload File, then your Paros profile. Your filename or profile name may differ. - 01.4
Confirm the import
If the import question appears, click OK.
ScreenshotWhat to look for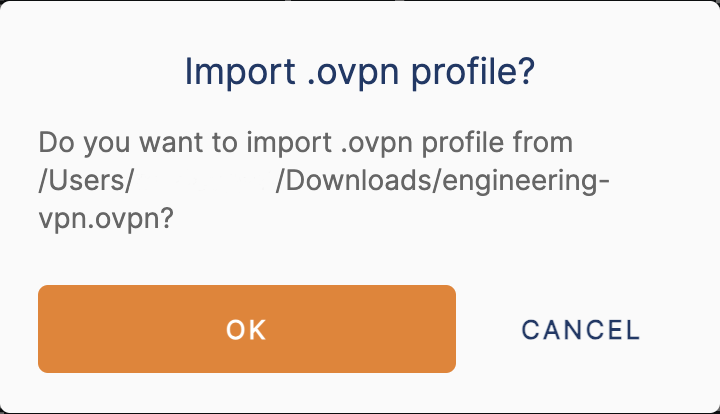
Click OK to import the profile. Your filename or profile name may differ. - 01.5
Use the VPN login
Connect the Paros profile. If asked, enter the OpenVPN username and password from the Playbook.
Example screenWhat to look forParos profile
UsernameFrom OpenVPN Connect loginPassword••••••••Use the VPN login, not the Synology Drive login. - 01.6
Look for Connected
Wait until OpenVPN says Connected. Keep it connected during remote uploads.
ScreenshotWhat to look forLook for Connected. Your filename or profile name may differ.
02Set up Synology DriveFirst time only · one upload folder13 steps
Already set up for Arta Video? Go to Upload your footage.
- 02.1
Install Synology Drive Client
Download Synology Drive Client for Mac. Open the installer and follow its prompts.
Example screenWhat to look forSynology Drive ClientDownloaded installerOpen the installer → follow its promptsIllustration of the downloaded installer. Your download name may differ. - 02.2
Sign in to Synology Drive
Use the NAS address, username, and password under Synology Drive Client login in the Playbook. Remote? Connect OpenVPN first.
Example screenWhat to look forSynology NASNAS address from the PlaybookUsernamevideographer-uploadPassword••••••••Already connected? Choose it from the previous connection list.
The Drive login and VPN login are listed separately in the Playbook. - 02.3
Click Not now on the QuickConnect prompt
If a pop-up asks “Do you want to switch to QuickConnect?”, click Not now. Continue with the connection you just entered.
Example screenWhat to look forDo you want to switch to QuickConnect?
This connection method strengthens data protection even when you’re on the go.
If this prompt appears, click Not now. - 02.4
Choose Sync Task
Choose Sync Task to set up your upload folder.
Example screenWhat to look for⇧Sync TaskSelected▣Backup TaskChoose Sync Task. - 02.5
Click Edit beside Synology NAS
Find Synology NAS. Click its Edit button.
Example screenWhat to look forSynology NASChoose the folder on our NASYour computerChoose the folder on your driveUse the Edit button in the Synology NAS row. - 02.6
Select Arta Video Intake
Under Team Folder, select Arta Video Intake itself. Leave the year folders inside it unselected.
Example screenWhat to look forTeam FolderArta Video IntakeSelected202620272028Select Arta Video Intake. Do not select 2026, 2027, 2028, or a wedding folder. - 02.7
Click Edit beside Your computer
Find Your computer. Click its Edit button.
Example screenWhat to look forSynology NASChoose the folder on our NASYour computerChoose the folder on your driveThis second Edit button chooses the folder on your own computer. - 02.8
Choose an empty upload folder
Choose your drive, then press the folder/+ icon in the top-right corner to create a new dedicated, empty upload folder, and title it “Arta Uploads”. Keep it separate from your personal backup folder. Uncheck Create an empty “SynologyDrive” folder, then click OK. Check that the location under Your computer ends in Arta Uploads.
Example screenWhat to look forYour drivePersonal BackupArta UploadsSelectedCreate an empty "SynologyDrive" folderLeave Create an empty “SynologyDrive” folder unchecked, then click OK. - 02.9
Open Advanced, then Sync Mode
Open Advanced. Choose the Sync Mode tab.
Example screenWhat to look forFolderFile FilterSync ModeThese two labels lead to the upload settings. - 02.10
Choose upload only
Select Upload data to Synology Drive Server only.
Example screenWhat to look forFolderFile FilterSync ModeTwo-way syncDownload data from Synology Drive Server onlyUpload data to Synology Drive Server onlyKeep locally deleted files on the serverEnable On-demand SyncEnable advanced consistency check (more resources required)The upload-only option is selected. - 02.11
Keep locally deleted files on the server
Turn on Keep locally deleted files on the server.
Example screenWhat to look forFolderFile FilterSync ModeTwo-way syncDownload data from Synology Drive Server onlyUpload data to Synology Drive Server onlyKeep locally deleted files on the serverEnable On-demand SyncEnable advanced consistency check (more resources required)Leave this checked. - 02.12
Turn off On-demand Sync
Turn off Enable On-demand Sync.
Example screenWhat to look forFolderFile FilterSync ModeTwo-way syncDownload data from Synology Drive Server onlyUpload data to Synology Drive Server onlyKeep locally deleted files on the serverEnable On-demand SyncEnable advanced consistency check (more resources required)Leave On-demand Sync unchecked. - 02.13
Save the settings and finish
In Sync Mode, leave Enable advanced consistency check (more resources required) checked. Click Apply to save the advanced settings, then click Done to finish.
Example screenWhat to look forFolderFile FilterSync ModeTwo-way syncDownload data from Synology Drive Server onlyUpload data to Synology Drive Server onlyKeep locally deleted files on the serverEnable On-demand SyncEnable advanced consistency check (more resources required)APPLY → DONESave advanced settings, then finish setupSynology NASArta Video IntakeYour computerYour drive / Arta UploadsKeep advanced consistency check checked. Apply saves the advanced settings; Done finishes setup.
03Upload your footageEvery wedding · six simple steps6 steps
Keep OpenVPN connected for remote uploads. On the studio network, use the studio NAS address in the Playbook.
- 03.1
Back up your footage first
Copy every recording from your cards to your personal hard drive. Keep this complete backup through final delivery.
Example screenWhat to look forMemory cardsCamera · drone · audio→Personal BackupKeep this copyMake your personal backup before starting an upload. - 03.2
Use the wedding folder structure
Everyone uses the exact same year and wedding name. Use WD for wedding day and RD for rehearsal dinner.
- A Cam: the primary videographer’s main camera.
- B Cam: the second shooter’s camera.
- C Cam: the primary videographer’s second camera for the ceremony or reception.
Upload only the footage you recorded into the correct camera, drone, or audio folders. Put the color profile in each camera or drone folder name, such as A Cam FLog2C.
Example screenWhat to look for202610-3 Lydia & PeterWDA Cam FLog2CSelectedB Cam SLog3C Cam FLog2CDrone DLogAudioRDA Cam FLog2CB Cam SLog3AudioMonth-day + couple’s names · RD only when filmed
Color profiles are examples. Use the profile you recorded in. Keep original filenames. - 03.3
Copy the whole project folder
In Finder, copy and paste your entire wedding folder into the matching year inside your Arta Uploads folder. Include its subfolders and footage.
Example screenWhat to look for202610-3 Lydia & PeterSelectedCOPY → PASTEKeep the personal backupArta Uploads202610-3 Lydia & PeterSelectedCopy the folder with its footage into Arta Uploads → year. - 03.4
Keep your computer awake
Leave the footage drive plugged in. On a MacBook, connect power and leave the lid open. Turn on the setting that prevents sleeping while the display is off.
Example screenWhat to look forMacBookSystem Settings → Battery → OptionsPrevent automatic sleeping on power adapter when the display is offDesktop MacSystem Settings → EnergyPrevent automatic sleeping when the display is offMac labels can vary by version. See Apple’s sleep-settings guide. - 03.5
Wait for Up to date
Click the Synology Drive icon in the Mac menu bar. Wait for Up to date and resolve any errors.
Example screenWhat to look for✓Up to dateRecently ChangedNotificationsC0001.MP4 UploadedUp to date is your cue to text Casey. It is not Casey’s acceptance. - 03.6
Text Casey
Text the wedding name, file count, and exact total bytes from your originals. Tell her if anything is missing.
Example screenWhat to look forReplace the bracketed fields with your own totals.
04What happens next?Casey checks the handoff3 steps
You keep your personal originals while the office handles the copy and verification.
- 04.1
Our drives make a second copy
Your upload arrives on HOT, our fast upload drive. The scheduled copy puts it in COLD → Incoming Footage.
Example screenWhat to look forHOTArta Video Intake↓COLDArta Wedding / Incoming FootageWeekdays 5 p.m.–8 a.m. Eastern · all weekend
It can take time for COLD to catch up. - 04.2
Casey confirms the upload
Casey asks Chat to compare file paths and sizes on HOT and COLD. She confirms the totals with you before accepting the wedding.
Example screenWhat to look forYour originalsFile count + exact bytes↔HOT + COLDPaths + file sizesCasey confirms the totals
A copy listing or matching total is not a byte-integrity test. - 04.3
Casey hands it to the editor
After verifying, Casey tells Chat to move the wedding to Editor Ready. She tells the editor where to find it.
Example screenWhat to look forIncoming FootageEditor ReadySelected202610-3 Lydia & PeterKeep your originals through final delivery. Ask Casey before deleting footage.
05If something goes wrongThree quick checks3 steps
Keep your originals in place while you work through a problem.
- 05.1
Upload paused?
Reconnect your footage drive, internet, and VPN. Check whether Synology Drive resumes.
Example screenWhat to look for▰Footage drivePlugged in⌁InternetConnected◒OpenVPNConnected remotelyCheck the three connections. - Example screenWhat to look forOpenVPN ConnectVPN login from the PlaybookSynology Drive ClientDrive login from the Playbook
Use the correct login for each app. Don’t put passwords in messages. - 05.3
COLD is behind?
The copy runs overnight on weekdays and all weekend. Ask Casey to check the copy status.
Example screenWhat to look forMON–FRI5 p.m. → 8 a.m.WEEKENDAll dayAmerica/New_YorkAsk Casey about the wedding’s copy status.